Introduction
AllStar nodes can be built in many ways, usually with tradeoffs between cost, features, ease of construction, portability, and audio quality. Most nodes now available support only half-duplex operation and often have low audio quality. Various radio-less node designs have been documented online but they seem to all be very basic and outdated.
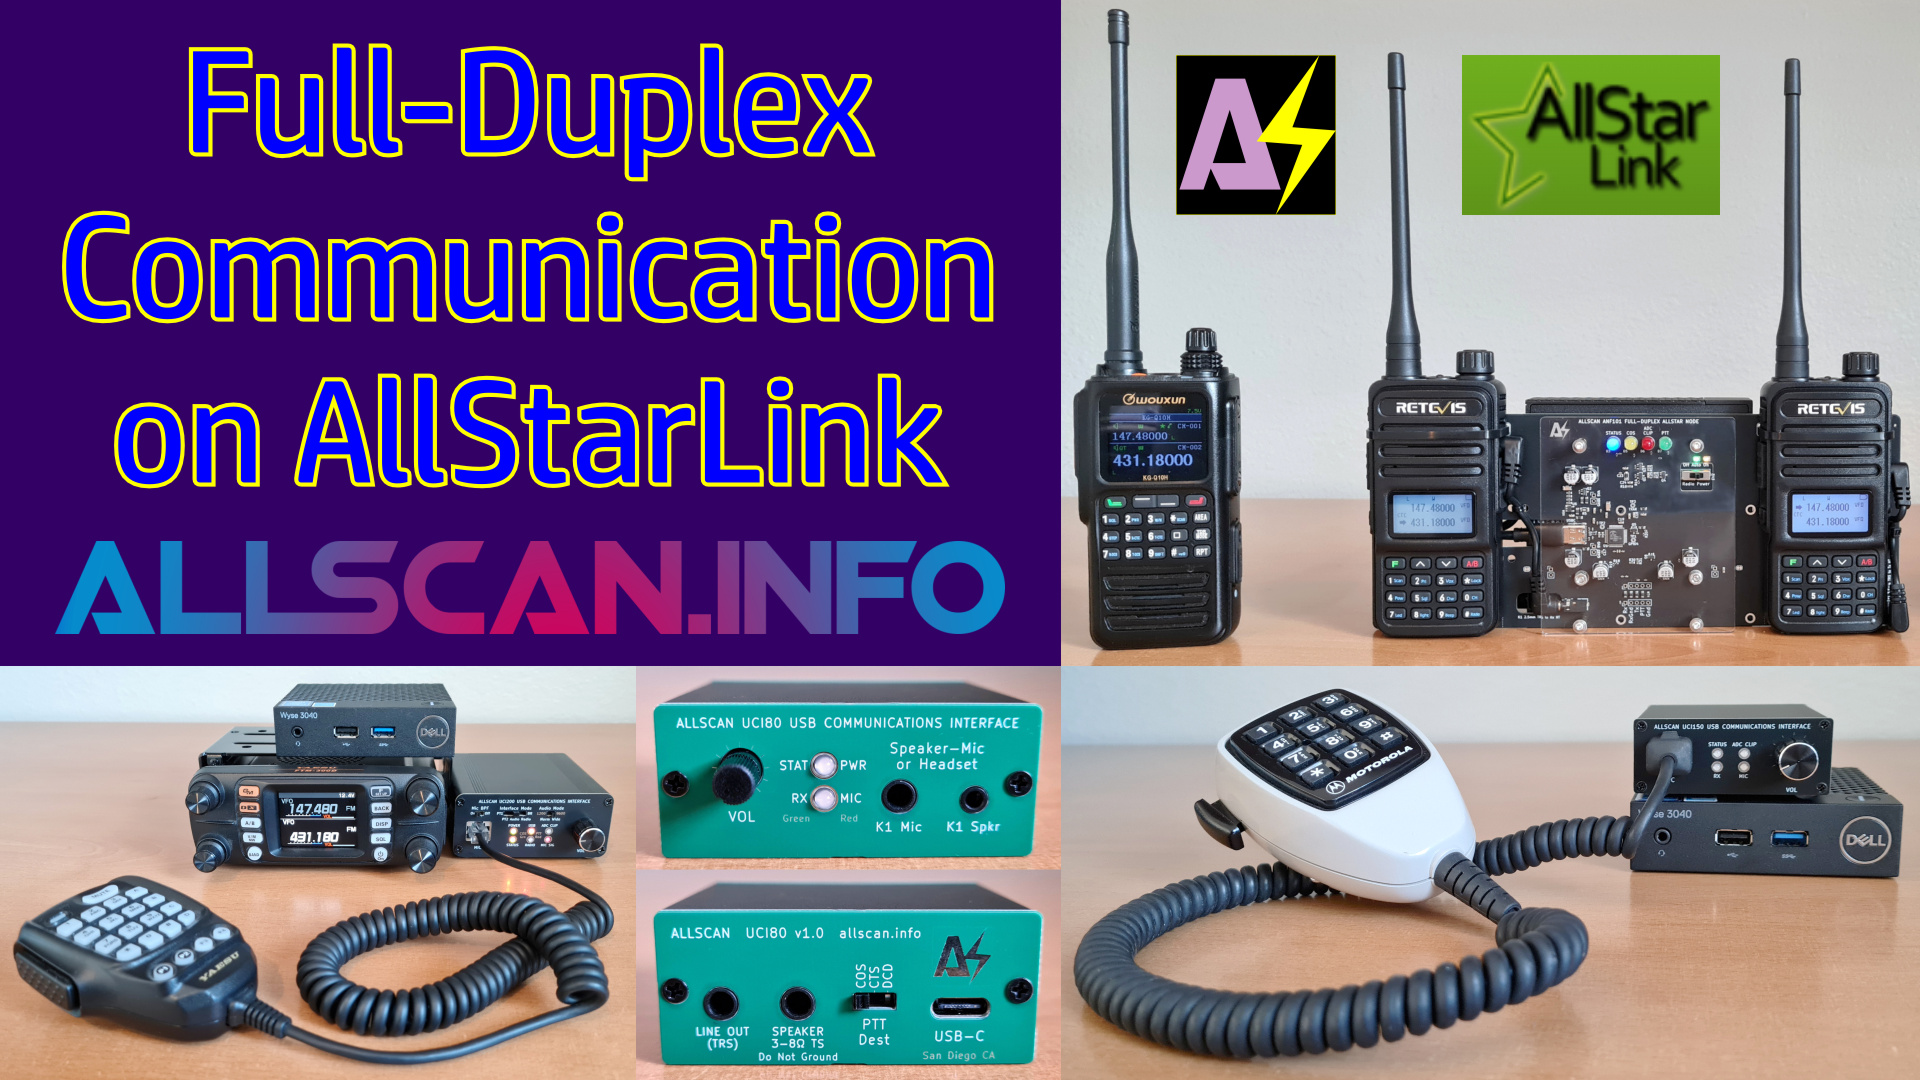
After months of research and testing starting in late 2022 I developed the AllScan ANF101 which is the highest-quality and most cost-effective full-duplex radio-based node on the market. I then took the same approach to radio-less nodes. My resulting ANR design delivers outstanding audio quality and dynamics while being low-cost, simple to build, easy to customize, with attractive enclosure options that perfectly complement MiniPC and RPi form factors.
AllScan ANR100 Radio-Less Node on Left (w/Dell Wyse 3040), ANR100-Mini on Right (w/RPi4)

Radio-less Node Benefits
Radioless nodes are ideal for use cases where WiFi or wired ethernet are available but the additional range provided by an HT or mobile radio is not needed, such as for a desk or table at your home QTH / office / shack, for vehicles or RVs where you have a wifi hotspot, and for 2nd offices, hotels, etc. Radio-less nodes are the simplest, easiest and most cost-effective way to get on AllStar with your own node, and are more portable than even the smallest radio-based node and radio needed to access it.
For a node that's sitting a few feet away on a desk it makes more sense to use a radioless node than to have multiple radios on transmitting 100's of milliWatts of RF. Or for the best of both worlds you can set up both a radio and radio-less node on one ASL server. MiniPC's and RPi's can easily accommodate multiple interfaces.
Radio-less nodes are more energy efficient, using generally less than a few Watts, vs. a node with radios plus other radio(s) to access it is easily 3 times the energy consumption. This efficiency means that a radio-less node can be left on and connected to your favorite repeater/hub 24x7 with no noticeable effect on your electric bill and no need to recharge batteries or leave radios powered on.
Radio-less nodes also support Full-Duplex by default. This is a powerful feature, as described in the Full-Duplex Communication Benefits section below, and makes a properly designed radio-less node much nicer to use than any half-duplex node.
Table of Contents
Overview
Quick Demo Video
- AllStarLink.org has excellent documentation and support making it easy to build your own node on Intel/AMD or RPi platforms. ASL is 100% open-source and supported by a large ham community including many experts who have used it for years with complex interlinked repeater systems.
- Dell Wyse 3040 and other Thin Client / Mini PCs are widely available for $25 or less on ebay, and have the same low power consumption as an RPi3/4 but with more features, including a power button so they can be turned on or cleanly shut down simply by pressing a button, a Real-Time-Clock IC that enables powering on and off on a schedule, built-in eMMC SSD memory, a shielded case with excellent EMC performance, better thermal management, and fanless silent operation. These are full-featured FCC-Certified PCs. Dell Wyse 3040's are 4"x4"x1.1" in size, barely larger than an RPi.
- There's no reason to settle for nodes with noisy audio (< 50dB SNR), substandard RF performance, or closed-source software. ASL3 brings AllStar up to the latest Debian Linux and Asterisk versions while making a number of other major improvements and fully supporting x64 and RPi platforms.
- Radio-less nodes automatically support Full-duplex, enabling more interactive and more efficient communications, preventing doubles, and improving situational awareness. Full-duplex smartphone VOIP/IAX apps and SIP phones can also be used with the node.
- The DVSwitch ASL distribution supports bridging to digital modes such as P25, D-STAR, YSF, DMR, etc. and is also fully open-source.
- AllStar nodes also support EchoLink with some simple configuration settings. If there are repeaters you know that support EchoLink but not AllStar I recommend asking the owners to also support AllStar. AllStar provides higher audio quality and many features that are not available in EchoLink.

AllScan ANR100 with Alinco EMS-57 DTMF Mic and External Speaker

AllScan ANR100-MGC - Back View
With optional Line Out Jack, 0/10/20dB Mic Boost Switch and Mic Gain Adjust Knob
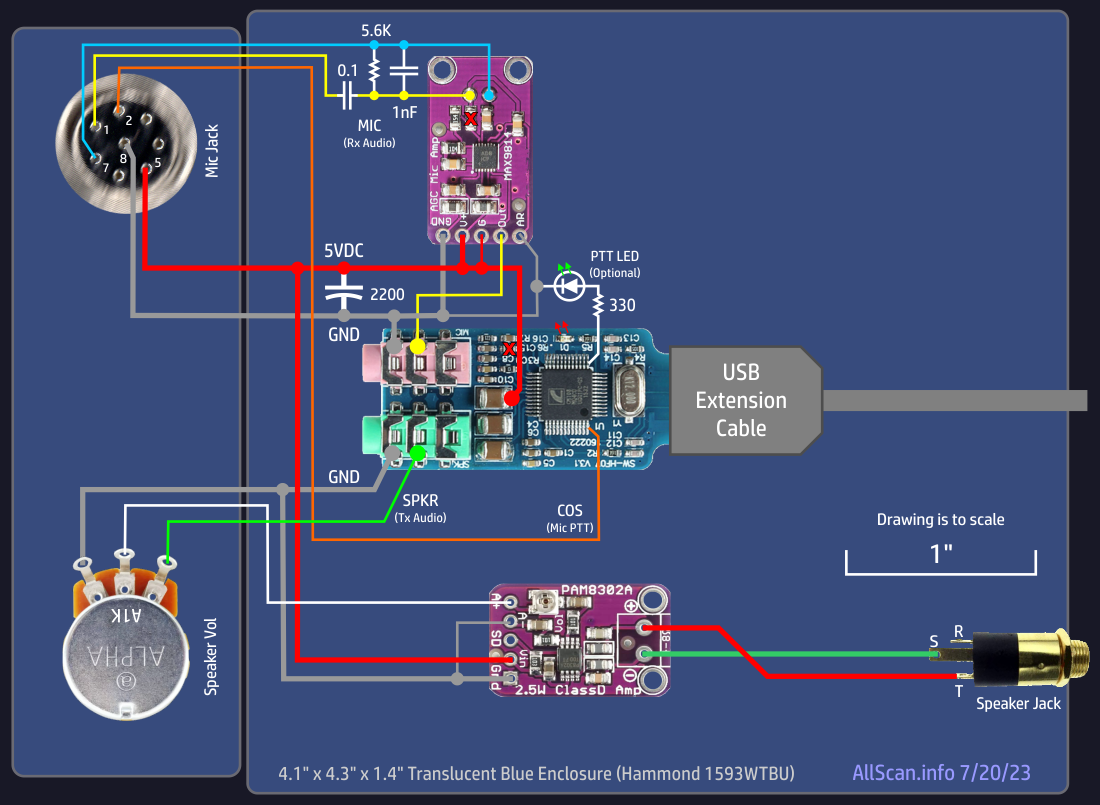
Wiring Diagram
To enlarge images Right-Click → Open Image in New Tab
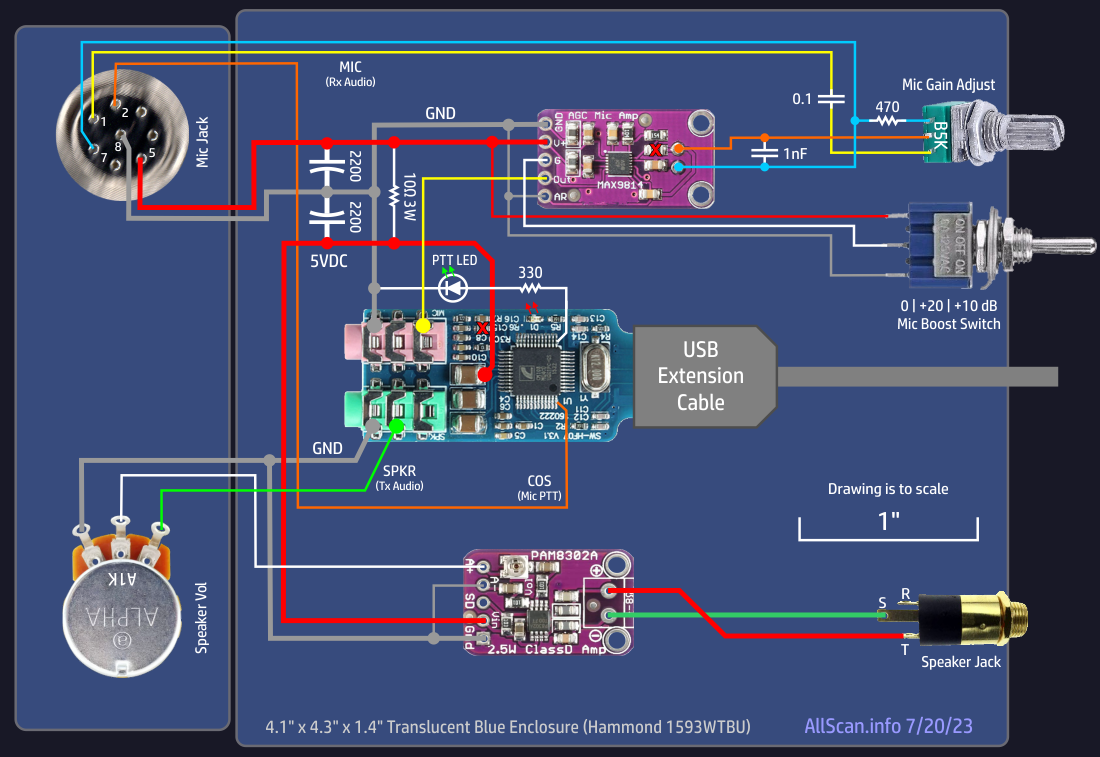
Wiring Diagram with Mic Gain Controls
Supports low output dynamic mics and easy adjustment of mic levels. These additional controls are not needed with Alinco EMS-57, Kenwood MC-60A, MC-80, MC-85 or similar mics, but are needed for dynamic mics that do not have a preamp or other mics that have unusually low or high output levels. The added 10Ω resistor and 2,200μF capacitor ensure the lowest possible noise, particularly with older preamplified mics that do not have good supply voltage filtering or mics that combine audio and 5V on one line. See the Products Page for more details.
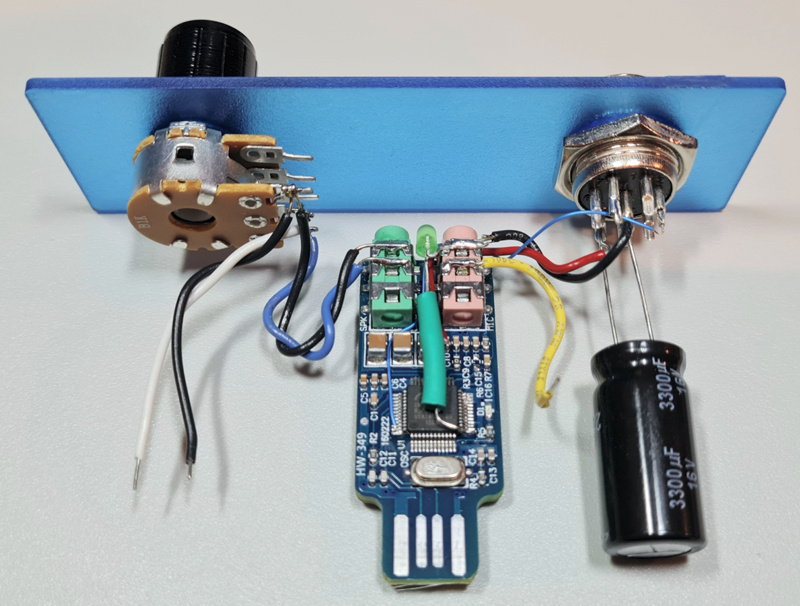
Completed Node Interface Module Interior View

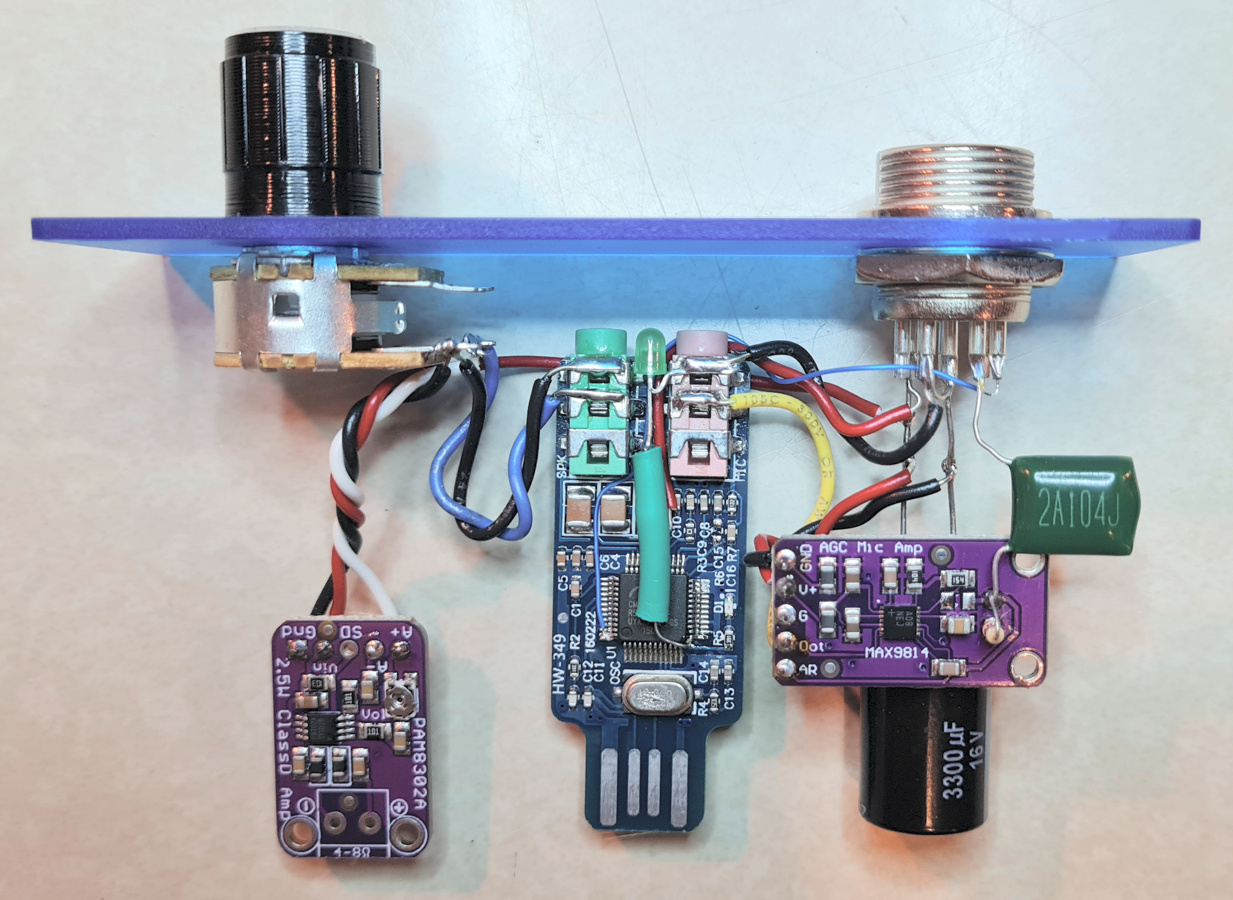
Completed Module Interior View with Optional Mic Gain Controls

Background
My other How-To Guide on building a full-duplex node using 2 low-cost HTs covers my background in engineering, ham radio, and AllStar, and many other details on the history and features of AllStar. I recommend reviewing that document for a broader context on the use and design of both radio-less nodes and nodes with radios. Each has its advantages, and you can also build a node that does both ie. that has radio(s) as well as speaker and mic jack connections. This Guide enables a full-featured node to be built that has excellent audio quality and yet costs less than any other node on the market.
History
AllStarLink (ASL) has been used for controlling repeater systems for 15+ years, supporting a high-precision multiplexing receiver system that precisely time-aligns audio feeds from any number of receivers. It's based on Asterisk, a powerful open-source PBX system that supports numerous features including full-duplex communications, conference calling, autopatch, integration with VOIP systems and equipment, voicemail, voice recognition, support for a wide range of codecs, and extensive control and monitoring capabilities via web and IP interfaces, DTMF commands, scripts and macros.
An AllStar node is part of a comprehensive system of GigaBytes of software and millions of lines of code that make up Linux, Asterisk, ASL, Apache, PHP, SQLite, and 1,000's of other utilities and programs that come with Linux. Linux, Asterisk and ASL are 100% open-source and free, meaning that not only is it free but that anyone can look at the source code, see how it works, modify it or improve it.
After having built and sold 50+ ANR100-A audio modules by hand in 2023-2024, in August 2024 I teamed up with Mark G1LRO to do a custom PC Board and enclosure – the AllScan UCI120. I can assemble UCI120's in 5-10 minutes of time vs. what used to take over an hour for an ANR100-A, which allows me to pass on the savings, with a complete UCI120 originally being only $99 (though I did later have to raise prices somewhat due to tariff increases and inflation). The UCI120 also adds significant new features including comprehensive status LEDs, Insert I/O jack, extensive switch configuration options, more thorough audio and RFI filtering, and a number of other optimizations. See the UCI120 Product Page for more details.
In early 2026 I released several new highly innovative radio-less interface products: The UCI80 which is the world's smallest and least expensive high-quality radio-less USB interface; the UCI150 which adds significant features above the UCI120 while being almost half the size; and the UCI200 which is the world's first Multi-Mode USB interface supporting 5 different interface modes.
Node Components
There are several main pieces to an AllStar node:
- A computing device (ASL "server"). This can be any Intel/AMD PC or Mini/Thin-Client PC, a Raspberry Pi, or a Linux server such as a linode.com VM. RPi's and many Mini PCs use only a few Watts of power.
- A radio/audio/GPIO interface. This usually consists of a small PC Board with a C-Media CM108 or CM119 IC that interfaces to a USB port and provides an audio input, audio output(s), and GPIO lines for PTT, COS, and status LED(s). This is usually referred to as a URI (USB Radio Interface), or in the case of a radio-less node a UCI (USB Communications Interface).
- A radio-based node would then need an integrated radio as well as some other radio to then talk to the node with, but for a radio-less node only a speaker and mic are needed, or an IAX phone/PC app can be used in which case the node needs no audio interface, mic or speaker and could consist solely of a Mini PC or cloud VM running ASL.
Smartphone/PC IAX apps such as DVSwitch Mobile (DVSM), iaxRpt and DroidStar can easily connect to a node. The DVSM 2.x Android app supports IAX client, Web-Transceiver, and Node modes. DVSM in Node Mode is a true AllStar node with its own ASL node number but with some idiosyncrasies and major limitations. VOIP phones can be convenient and usually have a speakerphone feature, and SIP phone apps such as Linphone can also be used. Because VOIP phones don't have a PTT button however it is necessary to dial *99 to key up and then # to unkey, which is not nearly as convenient as a real radio or PTT mic. See this article for details on how to set up VOIP phones/apps on AllStar nodes. This also covers ASL's autopatch feature, enabling VOIP calls to be made from a radio.
Laptop and Netbook nodes are perfect for traveling and for home use, and at not much more than $100 are a very cost-effective way to add an LCD screen, keyboard, trackpad, SSD, more memory, and the latest Linux with 1,000's of free programs. Laptop Node Demo Video
AllScan ANR100-NB Netbook Node

I prefer laptops over netbooks as they have a larger screen, nicer keyboard, more I/O connections and more memory. Installing Debian on any PC or laptop is a great move – Linux and open-source software only get better over time due to being based on open standards and long-term stability. The Linux KDE Desktop Environment is similar to Windows and very easy-to-use.
Audio Requirements
An audio interface used with communications microphones should have equal or better audio performance and features as even the best radio equipment. FM radios provide well-controlled audio filtering and limiting to ensure that transmitted RF is not overdeviated, which results in improved consistency of audio levels, maximizes average Signal-To-Noise Ratio (SNR) and better utilizes the available dynamic range of typical RF communications channels.
In nearly all pro audio, recording and broadcast applications some processing is done on voice signals which can include filtering out low and high frequency noise, clicks and pops, compressing the signal to give higher and more consistent average power levels, and limiting to prevent overly loud peaks and distortion.
Mic Audio Processing
Consistent audio levels and dynamics are important on any communication network, otherwise users have to make frequent volume adjustments to properly hear everyone. This is an issue on AllStar and I recommend that any time you hear someone who is significantly quieter or louder than average – let them know. Audio levels are easy to adjust on AllStar and there is no good reason anyone should have improper levels that require everyone else to ride their volume controls or listen to distorted audio.
With the highly-optimized AllScan UCI series USB Communications Interfaces now available at a low cost (only $49 for a UCI80), spending hours to build a radio-less node interface may be more hassle than it's worth but can be a fun electronics project. Building a radio-less node is fairly simple if you're experienced with computers, Linux and AllStar. With a few optimizations and a high-quality microphone a radio-less node can sound as good as any radio, providing a full, clear sound typical of high-quality FM repeaters. This can be achieved in several ways:
- Use a mic that has a built-in compressor such as a Kenwood MC-85, Icom SM-10 or similar model that will run on a batteries or from a 5~12V supply. This can result in excellent audio quality, though can increase costs and decrease portability.
- Run a good quality studio mic into a mixing console, mic channel strip, or mic preamp & dynamics processor and then into the node. This can result in professional-level audio quality but requires a somewhat more complex setup.
- A simpler approach is to add a small inexpensive mic preamp and dynamics processing module(s) in the node, in which case a standard DTMF hand mic can be used with no extra boxes or cables needed.
Mic audio should have a slight amount of compression (eg. a 2:1 ratio) or similar AGC (Auto Gain Control) functionality along with hard-limiting to ensure no ADC clipping and a similar sound to high quality radio-based nodes. An AGC is essentially a compressor/limiter but with a longer release time and may include a gain hold time to provide more stable gain and thus more transparent audio. In this application the objective is to move the input range of a typical mic output (which can have 60+dB of dynamic range but with low average power and loud plosives, clicks and pops) to a higher average power level with hard-limiting of any overly loud peaks, ensuring the signal will come through clearly – even in loud environments that may have only 20dB of dynamic range.
This article on Repeater-Builder.com talks about dynamics processing in more detail, proposing an Auto-Gain Control (AGC) controlled by a side-chain signal low-passed between 800~1500 Hz to provide smooth subtle leveling while not significantly affecting the higher frequency content and intelligibility. This could be useful not only for radioless nodes but for any node.
The microphone is the first step in the signal chain of any node and if the audio levels, frequency response and linearity of the mic are bad, there is only so much that can be done to fix it. The audio may still sound thin, muffled or tinny, and lack detail and presence. In having tested many studio mics, desk mics, and hand mics I have heard only a few hand mics (Kenwood KMC-18, Motorola HMN10xx and TDN83xx series) that can sound as good as a high quality desk mic (such as the Kenwood MC-60A, Icom SM-10 or SM-50), higher-end dynamic mic (such as a Sennheiser e935), or condenser mic (such as a Rode NT3), but proper dynamics processing can make even average hand mics sound almost as good. As with any radio or audio system, the node will only sound as good as the microphone, thus an important consideration is finding a mic with excellent audio quality at a reasonable price.
AllStar nodes should support the use of a DTMF mic or keypad for control functions, which implies that a radioless node should either use a DTMF mic or integrate a DTMF keypad. DTMF commands can also be executed in AllScan, Allmon or other apps, thus a DTMF mic is not essential. Getting a mic that already has a DTMF keypad is simpler but limits the options to those that output actual DTMF audio rather than serial port data. I recommend a genuine Alinco EMS-57 or EMS-79 as it's one of the few widely available models that meets these requirements and works with 5V. This is a basic hand mic however and greatly benefits from AGC processing and filtering. Whatever you do be sure to avoid the $20 knockoff EMS-57 mics on amazon/ebay/etc. I have tested them and they sound terrible, with extremely thin audio and very high handling noise. Those who know the value of good quality audio probably already have a good mic or two that could be shared with a UCI using a mic/radio switch.
To ensure audio levels and quality will be on par with even the best radio equipment an Analog Devices MAX9814 Mic Preamp & AGC module is used in AllScan UCIs to provide low-noise mic preamplification, limiting, and a small amount of compression/AGC with attack and release times optimized for voice signals. The MAX9814 works very well with no audible noise, providing a nice smoothing out of levels and limiting without overcompression. The fast attack times provide hard-limiting while the longer release times plus 30ms hold time provide smooth detailed audio that makes optimal use of ADC dynamic range. These modules are available for under $3, which is quite a reasonable price for the resulting huge improvement in audio quality.
The MAX9814 needs no adjustments other than setting the Gain and AR ratios to the desired values. Gain should usually be set to 0dB (tie to 5V), and AR of 8x (No Connect) seems to give the smoothest overall audio. These modules have a 220nF timing capacitor resulting in an AGC attack time of 0.5mS and a release time of 265mS (with AR of 1x).
Without an audio processing module there would be nothing to provide limiting of the mic signal, and because hand mics have low output levels with a lot of handling noise, clicks and plosives, the result would be poor sound quality with low average power levels. This is often an issue to some extent even with radio-based nodes when radios are used that do not have mic gain or other adjustment options. Some of these functions could be provided in the node software but this would not take full advantage of the ADC dynamic range or prevent clipping thus the better solution is to optimize the audio at the analog source.
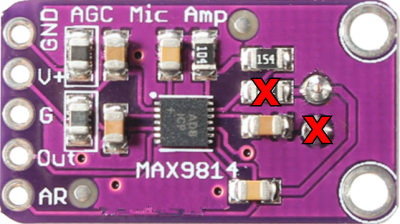
These are well designed modules with ferrite beads for RFI rejection, low power consumption, and very low noise. For more details review the MAX9814 IC datasheet and other info online. With these modules being ≤ $5 there is no excuse to not use one in a radio-less node. These have an electret mic and bias resistor on the module which should both be removed. The mic audio line then connects to the Mic In pad location shown above.
I have also tested MAX4466 mic preamp and SSM2167 dynamics processing modules. The SSM2167's noise gate threshold is too high and is not adjustable which has a very audible effect where quieter parts of the mic audio are cut out (gated). This could be a desirable feature in some cases but with no way to turn it off it's not ideal for general use. Thus significant gain is required in front of the 2167 eg. with a MAX4466 preamp to keep the signal above the noise gate threshold, but this results in significant low frequency noise (-20 to -30 dBFS) even with sharp high-pass filtering. The output of the SSM2167 is then clear and loud and sounds good, with average levels well above its noise floor, but is significantly overcompressed due its compression region being only 31dB wide after which it goes into hard-limiting. I also tested the SSM2166 IC (larger version of the 2167 with more adjustment settings and lower noise gate threshold), which requires more components and does not appear to be available on any low-cost module, and it soon became clear why it is nowhere near as popular as the MAX9814 – the SSM2166 has a lot of noise and audible artifacts regardless of the settings.
The UCI120, UCI150 and UCI200 provide an Insert I/O jack to support further processing of the signal such as with an EQ or PC audio interface, for example with a PC running a program that supports real-time effects processing or that lets you patch in ARRL news or other audio programs. The Insert I/O jack has the AGC output on the 3.5mm jack Tip (Send), with the jack Ring (Return) going to the ADC.
Mic Technique
With the MAX9814 the audio sounds transparent, smooth and even, not at all overcompressed or distorted, pops/clicks/plosives/handling noise well limited, with clear full-sounding audio whether talking 2" or 6" away from the mic. Note however that talking any closer than 2" from a mic is generally bad mic technique. Your audio will be much smoother with a few inches of space between you and the mic and with the mic at an angle so that bursts of air (plosives) are not aimed directly at it. You should set your mic gain so that you can talk in a normal voice a few inches from the mic and have plenty of gain. There is a tendency with mics to assume you need to talk louder and closer to the mic than you really should and it takes some practice (using parrot/echo mode) to get a more polished sound.
Speaker Audio Processing
Signals from AllStar or other ROIP apps can vary significantly due to some users having improper gain settings. Most radios will not make an overly quiet signal louder but they will limit overly loud signals. To give similar levels and dynamics to a radio, processing can be done on speaker audio to compress or hard limit signals above ~-10dBFS peak or ~-20dBFS RMS. In the Tx audio direction AGC and limiting is easier to do because the signal is in the digital domain where processing can be done in the application. Thus the UCI should only need to provide basic filtering to prevent excessive low and high frequencies from going to the speaker.
Audio coming from the network is referred to as Tx audio, as it's what would be transmitted over a local radio or repeater in most node configurations, but because the UCI functions like a radio – in the sense that you plug in a mic and speaker, when you key up the mic you're transmitting, and you then listen to received signals – the "RX" LED in fact indicates that the UCI is receiving audio from the USB host.
Asterisk provides an AGC function that can be enabled in extensions.conf and this could be helpful if you find that nodes, repeaters, or nets you listen to have a lot of volume variation between different users.
Below is an AllScan ANR200 built with a Kenwood SP-70 communications speaker, with a Symetrix 528E Voice Processor in the Insert I/O loop and 421m AGC Leveler connected to the Line Out. The 528E is used for mic audio dynamics processing and powering a Rode NT3 Condenser Mic w/Inrad DMS-1 PTT Mic Base. The 421m processes the node output audio ensuring smooth even levels from AllStar, bringing up overly quiet stations and reducing the levels on overly loud stations. Most AllStar users have good audio levels in which case the 421m makes no difference but it is helpful for those occasional users who are too quiet or too loud. The 421m does add some quiet white noise to the audio output which is not an issue in radio / repeater nodes that already do bandpass filtering, or in radio-less nodes can be removed with a ~3KHz low-pass filter or with a speaker or mixer that has built-in filters. Between the features of AllScan UCI120 or UCI150 and what can be done in Asterisk and ASL however there is really no need for external processors, with possible exception of more advanced mic processing tailored to your specific voice and mic(s).

Parts List and Component Options
The main components I recommend are as follows, with purchase links and approximate prices:
- Dell Wyse 3040 MiniPC with AC Adapter - $35
- Hammond 1593WTBU Translucent Blue Enclosure - $9
- 8-Pin Panel Mount Mic Jack - $3
- 1KΩ Audio-Taper Potentiometer with Knob - $2
- 3.5mm Panel Mount Phone Jack - $2
- PAM8302A Audio Amplifier Module - $3
- MAX9814 Mic Preamp & AGC Module - $1
- 100μF 10V Low-Impedance Capacitor - $1
- 0.1μF Film Capacitor - $1
- 1nF Ceramic Disk Capacitor - $1
- PTT LED (optional) - $1
- Various 1/4 Watt Resistors (see wiring diagram) - $1
Total: $60
The above items are available from many sources and can be purchased from the links above or from any other reputable source. Or I have kits available with all of the above parts other than the enclosure.
The PAM8302A modules are an Adafruit design and have been copied by many other sellers but unfortunately most of the copies do not work well and have significant distortion on the audio. Therefore only the module from Adafruit or from a reputable US seller with excellent reviews should be used. I would recommend the Adafruit MAX9814 module also but have had no issues with MAX9814 modules from other sellers.
Dell Wyse 3040 MiniPCs have been used in 100's of AllStar nodes and work great due to their wide availability, low cost, simple set up and reliable operation. Many have built-in WiFi cards and dual antennas, though I prefer wired Ethernet whenever possible for maximum performance and less potential RFI. Many 3040's run on 5V 3A, but more recent "12V" versions will run on 5-15V. Even a used 5+ year old 3040 should run very well for many years. The design is well thought-out with excellent thermal management and no fan to pull dust inside. If getting one that's more than a few years old the small backup battery should be checked and replaced if below 3V. CR2032 batteries are available for as little as $1.
Beelink T5 MiniPCs also work very well. Or RPi5's can be a good option but are less reliable and more expensive than 3040s.
USB Interface
CM108 USB Sound fobs are less than $5 but require modifications and fine soldering. Fobs can be noisier in high-RFI environments, which is generally not an issue with a radio-less node but could be an issue if you will also be transmitting 100+W on HF or 5+W on VHF/UHF within ~5-10' of the node.
Various URI's are available but are a bit more expensive, thus it makes more sense to just go with an AllScan UCI – which due to their high-level of integration provide many more features at very reasonable prices, starting at $39 for a UCI80 PCB.
CM108 USB interfaces work well but require some modifications, including soldering onto a ~0.01" (0.25mm) wide IC pin. If you have a microscope and experience with soldering surface-mount parts this is easy to do but otherwise could be challenging.
The CM108 fobs' stereo line out audio is excellent (Hi-Fi/CD quality) but the (unmodified) mic input has significant digital noise in the intended use with an electret mic. Removing bias resistor R6 solves that issue and the audio input then sounds great with over 60dB SNR. If you're good at fine soldering it only takes about 10 minutes to remove R6 and solder on wires for COS (Mic PTT) and the audio, 5VDC and Ground lines.
The CM1xx-series ~45dB mixer gain range supports the mic input and audio output very well with no trim pots or resistors needed. ASL sets these gain settings in the IC based on the rxmixerset, txmixaset and txmixbset config settings. This provides a wide adjustment range while retaining the full dynamic range of the 16-bit converters.
There is a similar fob made by Syba that uses a CM119A IC. These go for $10, which is still very cheap. The Syba fob has a small plastic case and a metal housing on the USB connector which is nice and is a good alternative but may not have any significant advantage over a CM108 fob. Only C-Media or Syba fobs should be used. Other fobs are not as well made or encapsulate the IC in a resin material preventing access to the pins.
RFI is much less likely to be an issue with a radio-less node, but as this will likely be used in ham shacks that have various radios in use, ideally the same RFI precautions should be taken as for a node with radios. See my other How-To Guides for details.
Additional Required Components
You may already have a microphone around with an 8-pin round plug wired for Kenwood or Alinco radios, which should work fine with this node, and you probably already have an external 3 - 8 Ω speaker with 1/8" (3.5mm) plug. This design uses 5V USB power from the MiniPC, which may not be enough voltage for some mics that are designed for 8V, though most such mics I have tested work fine on 5V. The Alinco EMS-57 is a good mic that is designed for 5V and has a built-in DTMF keypad and encoder. Some other mics with keypads don't actually have a DTMF encoder and instead send serial data out expecting a radio to then generate the DTMF tones. Be sure to review the schematic and pinout of any mic before using with a radio-less interface.
A variety of other mics and mic jacks can also be used. If a mic does not work on 5V a small DC-DC converter such as a B6287 module can be added to supply 8V or any other needed voltage. 10Ω–470μF RC filters are recommended on both sides of the converter to reduce noise. (The AllScan MA1 Mic Adapter provides all this in a compact package at a low price.) Battery powered mics are also a good option such as a Rode NT3 with an Inrad DMS-1 desk mic stand.
AllScan is an authorized Alinco reseller and I have EMS-57's in stock for immediate shipment. The genuine EMS-57 sound literally 10 times better than the $20 counterfeit EMS-57s available on amazon/ebay/etc. The genuine Alinco has a much fuller sound, better presence, much lower handling noise, and a longer more pliable coiled cord. Good mics are a great long-term investment and everyone on AllStar will greatly appreciate the difference in audio quality.
Kenwood MC-60A, MC-80 and MC-85 desk mics are great options that sound better than pretty much all hand mics, work fine on 5V (no batteries needed), have built-in preamps, and have similar output audio levels as an EMS-57. Many Icom desk mics can also work great but require an adapter to go to a Kenwood/Alinco mic pinout.
Any 3 - 8 Ω speaker should be fine but for good audio quality I would recommend a small mobile speaker from Icom, Kenwood or Yaesu such as an SP-35 or MLS-100 which are around $30. Almost every speaker I've tried that costs under $20 has sounded terrible, whereas old Heathkit, Motorola, Kenwood and many other vintage speakers often sound excellent and can be easily found for ~$25 - $50. Amazon has some speakers that are only $19/pair and sound pretty good.
A small PAM8302A amp module has plenty of volume for most environments, but for louder environments eg. driving on the highway with the windows open you may need something a bit louder. The PAM8302A module will output 2.5W @ 4Ω and 1.5W @ 8Ω or there are many other small audio amp modules available with power ratings into the 50+Watt range but you would then need to power the amp module from a separate power supply, as URIs or miniPC USB ports will only be able to supply about 5V 1-2A. AllScan URIs now use a class-AB TPA6211 2.5W audio amp, which will also drive single-ended speakers such as in a speaker-mic.
Another option would be to integrate a small FM radio transmitter module into the node which would allow any FM stereo receiver, boombox, or car stereo to be used as the speaker. This would make the node even more portable because a separate speaker would not be needed. Many stereos also have an 1/8" Aux input, which would provide even better quality than a wireless FM stereo link. To support that just add an 1/8" TRS Line Out jack to the node in addition to the speaker jack output. The Line Out jack Tip and Ring terminals can connect directly to CM108 L&R audio outputs. ASL does support output to both channels thus stereo cables and devices are supported.
Some basic wiring (such as 24 ga. Hookup wire) is then needed to connect all the above together.
Optional Components
To add the Mic Gain Control (MGC) options you'll need a ~150Ω resistor and the following:
- SPDT On-Off-On Toggle Switch - $2
- 5KΩ Linear-Taper Potentiometer with Knob - $2
- 2,200μF 10V Low-Impedance Capacitor - $1
- 10Ω 3 Watt Resistor - $1
Total: $6
Enclosure Options
Die-cast or extruded aluminum enclosures are essentially indestructible and have a nice "industrial" look. ABS, polycarbonate, or other plastic enclosures are also very durable, cost less and are a little easier to cut and drill. RFI can be more likely to occur with non-metallic enclosures but that's less likely to be an issue with radio-less nodes. Steel can work also but is harder to cut and drill.
Hammond 1593WTBU translucent blue enclosures are a great size (4.1" x 4.3" x 1.4") that's just slightly wider than Dell 3040s, and make it easy to see the status LEDs without needing to mount LEDs on the exterior. Clear visibility of the PC and radio interface is important. Sometimes things happen on AllStar such as disconnects or timeouts and the status LEDs make it easier to see what's going on. Or the Hammond 1593BBTBU (3.75" x 3" x 1.2") can be used for a smaller form factor similar to RPi's. The smaller version is slightly more difficult to assemble however due to the limited internal space, with little extra room for other options such as a Mic Gain Control switch and knob.
Integrating things into an existing speaker enclosure is a great option. There are 100's of speakers available on ebay from vintage 1950's Heathkit or Motorola mobile speakers to many classic Kenwood, Icom, Ten-Tec, Hallicrafters, Drake, etc. models from the past 75 years. Pairing a high-quality speaker with a classic desk mic such as an MC-60A can result in a node that looks and sounds great.

For this build I added a bi-color status LED, mic jack, volume control, and A/B switch supporting the original functionality of an external input from any rig. This also has mic gain controls and a preamp/AGC bypass switch on the back to allow the node to be used with an external dynamics processor.
For portable applications a USB power pack can be used (eg. link). Dell Wyse 3040 and many MiniPCs can be powered from a USB power source, which in the case of a 3040 requires a USB to 4.0x1.7mm power adapter cable. Demo Video
Setup Steps
Dell Wyse 3040 MiniPC
Installing ASL3 on a Dell 3040, other Mini PC, or Laptop/Netbook is not hard if you're experienced in building/maintaining PCs. The 3040's have a UEFI-only BIOS that needs a boot file in a specific place. Making a UEFI USB drive is simple: Download the amd64 ISO from debian.org/CD/netinst/, then format the USB drive as FAT32 and unzip the ISO into the root folder (7-Zip is a good program for unzipping ISOs). Do not try to make the USB drive "legacy bootable".
There have been rare cases reported where people were not able to properly copy ISO files to a USB drive but were finally able to get it working using "Rufus", a free program that can create UEFI USBs. It's probably not going to do anything that 7-Zip wouldn't but maybe it has fewer options and thus is more resistant to user error.
To initially set up a 3040 requires a USB keyboard and a monitor/TV with a DisplayPort cable. Plug in the keyboard and DisplayPort cable, and plug in the Debian USB drive. Power up the 3040 and when you see the Dell logo hit F2 to enter BIOS setup. Some 3040's may have a BIOS password which defaults to "Fireport". This can be cleared in the Security section or if some other password was set can be cleared with a button on the PCB. You should then Wipe the eMMC using the Wipe option in the Maintenance section. This is very important to do to ensure that the eMMC is fully functional, and will then also speed up the OS install. If the eMMC wipe fails you should return the 3040. All 3040's I sell have already had the eMMC wiped as part of my refurbishing process. Recommended BIOS settings:
System Configuration
→ UEFI Network Stack: Disabled
→ Integrated NIC: Enabled (NOT w/PXE)
→ USB Configuration: Enable all checkboxes
Secure Boot: Disabled
Performance
→ Intel SpeedStep: Disabled
→ C-States Control: Disabled
→ Limit CPUID Value: Disabled
→ Intel TurboBoost: Enabled
Power Management
→ AC Recovery: Last Power State
→ USB Wake Support: Disabled
→ Wake on LAN: Disabled
POST Behavior
→ Fastboot: Thorough
→ Extended BIOS POST Time: 0
Virtualization Support: Disabled
Do not skip any of these settings - ASL may not function optimally without some of them. Nothing should need to be changed on the boot order page or any other pages. Once you have confirmed the BIOS settings, save and exit, and it is advised to then hit F2 again and double-check that all settings were in fact saved properly. (If the "Secure Boot" setting was enabled it usually has to disabled twice ie. there seems to be a bug where the setting change doesn't take effect on the first attempt.) Then after the unit reboots and you see the Dell logo hit F12 for the boot menu, then select the USB drive. The Debian installer menu will then appear.
The Debian net install image is intended to boot on a removable device and install Debian on an internal storage device (or on a separate removable USB drive / SD Card). This differs from the RPi "appliance" image which goes on an SD Card, into the RPi, and the OS install is done. The Debian install takes about 20 minutes to complete. The default options should be fine but if there is anything you are not sure about, do a web search from another computer and try to clarify any questions you have. The ASL2 image did not have the boot file where 3040's need it to be (/boot/efi/...), requiring an extra step to copy the boot file, but fortunately the Debian installer provides this option.
- Select the "Advanced" non-graphical install option as it will better explain each step and not skip any important details. Other options may not show the "Force GRUB install to EFI path" option which is required for 3040's.
- Install to the internal eMMC drive, overwriting ALL existing partitions.
- Select your preferred Desktop Environment (should be none if the 3040 has only 8GB eMMC or if you do not plan to use the 3040 with a keyboard and monitor, otherwise KDE is recommended), and select "web server" and "SSH server" options to install.
- When prompted to create a user account, do not enable a login/password for the root account (this is more secure), and be sure to write down the name and password you enter for your user account.
- The "Force GRUB install...to EFI..." option is required for Dell Wyse 3040's. Select Yes for this step.
Installing on other Thin Client models or on a Netbook or Laptop should be even easier. (Note however that Chromebooks should be avoided, as ChromeOS is a closed and encumbered platform.)
A Desktop Environment such as KDE can be nice if you have a monitor, TV, or remote desktop app. This can simplify WiFi and network management but does require a 16GB 3040 version to fit everything. However ASL3 recently made an "appliance" version available for Debian 13 that adds a web management interface ("Cockpit") and integrated WiFi manager, which should now make entering WiFi details and selecting networks much easier, just by going to the node's IP/mDNS URL followed by ":9090" in any browser. With this being the case there's no need for a desktop environment, which saves several GB of space and means that 8GB Dell 3040s are more than sufficient.
Beelink T5 or NucBox MiniPCs
Installing Debian on a Beelink T5, GMKtek NucBox, or other similar recent Mini PC model is simple. First, make a UEFI USB drive by downloading the amd64 ISO from debian.org/CD/netinst/, then format the USB drive as FAT32 and unzip the ISO into the root folder (7-Zip is a good program for unzipping ISOs). Do not try to make the USB drive "legacy bootable".
Plug in a USB keyboard and a monitor/TV with HDMI cable into the MiniPC. Many Mini PCs include Windows 11. If you want to keep Windows you will want to let it boot and update itself (which can take over an hour) and then use the Windows Disk Management tool to shrink the C drive by 50%, ie. for a Mini PC with 128GB eMMC/SSD, shrink it by 65,535KB, thereby leaving 64GB of unallocated space, or for a mini PC with 64GB eMMC shrink the C drive by 32,767KB. When setting up Win11 I recommend during the setup specifying that the PC will be used for "work". There is no need to create a Microsoft account. In reality it is unlikely you'd ever have any need for Windows on a node MiniPC, and with the 1+ hours of time it takes a new Win 11 install to update itself, keeping Windows is probably not worth the time and hassle.
I recommend disabling all unnecessary options in the MiniPC BIOS, including Intel SpeedStep, C-States, Secure Boot, TPM module, Wake on LAN, Virtualization, Network/PXE boot, and legacy device support. Then power off the MiniPC, plug in the Debian USB drive, press the power button and you will see the Debian installer menu. The Debian install takes about 10 minutes to complete. The default options should be fine but if there is anything you are not sure about do a web search from another computer to clarify any questions. I recommend the "High-contrast", "Advanced" non-graphical install option.
- Install to the internal SSD drive. If keeping Win 11 select to install to the "largest unallocated partition", otherwise overwrite ALL existing partitions.
- Select your preferred Desktop Environment (I recommend KDE), and select "web server" and "SSH server" options to install.
- When prompted to create a user account, do not enable a login/password for the root account (this is more secure), and be sure to write down the name and password you enter for your user account.
Note: Beelink T5 MiniPCs have an internal fan and a jumper that selects if the USB Port is powered when the PC is off. The fan is not needed if the T5 is used only for ASL which uses very little CPU power, and T5s run very cool without it. The USB power jumper defaults to on which results in USB devices remaining powered when the node is off which is a waste of energy. If you would prefer the T5 to be silent the fan can be unplugged, and it's a good idea to set the USB power jumper to not power devices when the PC is off. The T5 has 4 screws at each corner on the bottom of the case that are easy to remove, just lift the ends of the rubber feet ~½" to access them. It then only takes a minute to unplug the fan and change the USB power jumper setting.
ASL3 Install
When the Debian install completes you will be prompted to remove the USB drive and power cycle the PC. Make sure it boots OK into Debian. The "hostname --all-ip-addresses" or "ip addr" command can then be used to get the node's LAN IP address. You can then SSH into the node, proceed with the ASL3 install as described in the ASL3 Manual, and provision it on the allstarlink.org Web Portal. An "appliance" option is now available for installing ASL3 on x64 (PC) platforms, which enables a web management interface with WiFi management plugin. I highly recommend this for MiniPCs that have WiFi, see this link for details.
Raspberry Pi's
RPi5's are a good option if used with a high-quality case, heat sinks and official RPi PD-capable power supply, and are easy to set up by following the detailed instructions on the ASL website. However as noted earlier RPi's have some known reliability issues and keeping a backup copy of the SDCard is recommended.
ASL Configuration
ASL3 brings Debian and Asterisk up to the latest versions and adds a number of new features and many significant improvements. Asl-menu can be used (run sudo asl-menu) to make the basic node settings – node#, password, IAX port, AMI password, and channel driver, but the .conf files should then be manually edited and all below settings confirmed. Asl-menu has become somewhat confusing and unreliable – it attempts to abstract away the underlying .conf file settings and instead present numerous pages of menus and options, but this has resulted in increased complexity and in important settings often being missed. I therefore recommend using asl-menu only to set the basic node# details, then exit, reboot the node, and manually edit the below files.
USBRadio bandpasses and limits outgoing IAX audio, which can result in a significant reduction in overall dynamic range and loudness. Thus I recommend the SimpleUSB driver as this transmits the mic audio over IAX exactly as it came in from the ADC. USBRadio's limiting and bandpass filtering could be useful if they were more flexible but there seems to be no option for makeup gain thus all audio is limited to ~-10dBFS. Tests on a Dell Wyse 3040 doing a full-duplex parrot test showed that the SimpleUSB driver and USBRadio driver in various modes use only about 10% total CPU, thus there should be plenty of headroom on 3040s and similar mini PCs.
rpt.conf Recommended Settings
rxchannel = SimpleUSB/[node#]
duplex = 3                     ; Full-duplex, do not repeat Rx audio to Tx audio
hangtime = 100
althangtime = 200
;linkunkeyct = ct8             ; Comment out to prevent courtesy tones when connected
holdofftelem = 1
telemdefault = 0               ; Prevent "node X connected to node Y" messages
; Uncomment following lines:
921 = cop,21                   ; Enable Parrot Mode
922 = cop,22                   ; Disable Parrot Mode
In ASL3 there may be 2 rxchannel lines, one with dahdi/pseudo and the 2nd with SimpleUSB/[node#]. Those lines should not need to be manually edited.
NOTE: I often get emails from people who have NOT made the below settings and then wonder why their node is not working. The below settings are required.
simpleusb.conf Required Settings
rxboost = no
carrierfrom = usbinvert
ctcssfrom = no           ; Important! ASL won't see COS if this is yes
deemphasis = no
plfilter = no            ; 'no' for increased bass / 'yes' to reduce low frequency noise
clipledgpio = 1          ; Supports ADC Clip LED
legacyaudioscaling = no
Updating ASL
Be sure to review the ASL3 Manual and follow the recommended steps to periodically update Debian and ASL. After setting up any node I recommend checking the system logfile (sudo journalctl) periodically to make sure there are no error messages shown during system boot and normal operation. If you see an error (for which a web search of the message does not reveal a simple fix) check the ASL Forum to see if it has been reported, and if not I suggest making a new post.
Backups
When I build nodes I use Clonezilla to restore an image with the latest ASL, AllScan and various other utilities already set up. I then update everything and make a backup copy of the node before shipping. For instructions on how to backup and restore a node using Clonezilla see this post.
Wiring and Assembly
The MiniPC/RPi provides 5V on the USB ports, with the USB Interface then providing 5V to the mic and audio modules.
To enlarge any image in this document, Right-Click → Open Image in New Tab
CM108 Fob Wiring
Using a ~$5 CM108 Sound Fob will result in a major cost savings vs. relatively expensive radio interface modules, and is easy to do if you have experience working with surface-mount electronics. Modification instructions:
- Remove resistor R6
- At the top middle there are 3 light brown capacitors in a row. Connect the 5VDC wire to the left side of the bottom capacitor (just above the "C10" text)
- Attach a 28 or 30 gauge wire to Pin 48 on the CM108 IC (COS)
- (optional) Attach a 300Ω resistor and LED to Pin 13 on the CM108 IC (PTT). Cover the resistor to LED connection in heat shrink tubing. Then connect the LED cathode to the Mic Jack Sleeve pad
- Connect wires for the Mic (Rx Audio) line, Spkr (Tx Audio) line, and Grounds
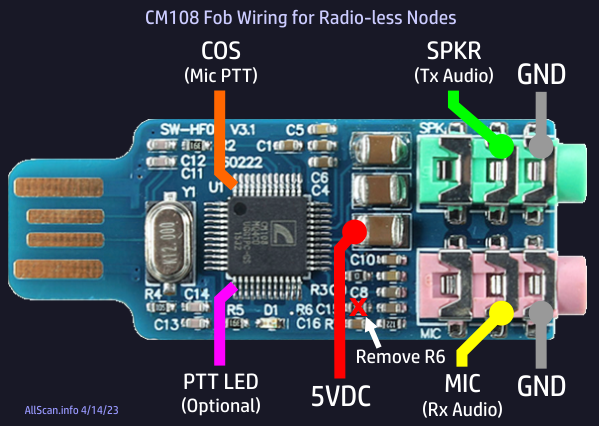
Wires can be soldered directly to the contacts on the tops of the 3.5mm jacks. The Tx Audio line should be taken from the 3.5mm jack Tip (Left channel - txmixa), or the jack Ring (Right channel - txmixb) can also be used.
Closeups showing wired CM108 fob ready for assembly into an ANR100


URI & Mic Wiring
The below diagram shows the lines that need to be connected to the 8-pin mic connector, followed by the connection locations on the USB Interface and other components. 5 wires need to be connected: Mic, Mic Gnd, PTT, 5VDC, and Gnd. The Mic and Mic Ground lines should be run as a twisted pair to the MAX9814 module. A ~1nF bypass cap should be placed across the mic input pads on the MAX9814 module.
Front View of Mic Jack (Kenwood/Alinco)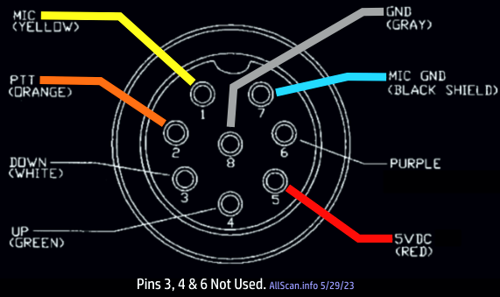
Wiring - Modified CM1xx Sound Fob
Line Out Jack Tip ------ Volume Control Potentiometer (Tx Audio)
Line Out Jack Sleeve --- Volume Control Potentiometer Ground
Mic In Jack Ring ------- MAX9814 Out (Rx Audio)
Min In Jack Sleeve ----- Mic Jack Pin 8 (Ground)
CM108 Pin 48 (COS) ----- Mic Jack Pin 2 (PTT)
CM108 Pin 13 (PTT) ----- PTT LED (optional)
MAX9814 Mic Preamp & AGC Wiring
The MAX9814 module first needs to have the electret mic element removed, which can be done by holding a soldering iron on both pins then pull it out or let it drop out. (Desoldering braid can be used to remove remaining solder.) Then remove the small bias resistor next to the Mic+ pad, connect 2 short wires for 5V and Ground, and connect the AR input to Ground. If you'll only be using mics such as a genuine Alinco EMS-57, Kenwood MC-60A, 80 or 85, or a mic that has an output level adjustment control, no mic gain adjustment controls should be needed and the MAX9814 Gain input should be connected to 5V.
To accommodate a wider gain range and support dynamic mics that do not have a built-in preamp, a 5KΩ potentiometer can be added before the MAX9814 module, and a SPDT (On/Off/On) switch can be added to allow the +10 and +20 dB MAX9814 gain options to be easily enabled. If you may at some point use a microphone other than the Alinco EMS-57, or if you have a loud voice or like to talk very close to the mic, this potentiometer will allow the gain to be reduced. The CM108 has additional gain available with the rxmixerset parameter but it does not have much room to reduce gain since the MAX9814 already provides 40dB of preamp + AGC gain, and in the case of low output dynamic mics these require additional gain in the 9814 preamp section to ensure proper AGC input levels.
To reduce low-frequency (LF) noise a 0.1μF film capacitor should be added between the mic jack and MAX9814 input. This forms an RC high-pass filter with the 5.6KΩ resistor (or 5KΩ MGC potentiometer + ~150Ω resistor if adding the Mic Gain Controls), with a -3dB frequency of around 300Hz (1/2𝜋RC) with a slope of 6db/octave. That's not a steep filter slope but will make it less likely that various LF noise such as wind noise or thumps will result in excessive limiting or clipping. If you have good mic technique and do not use the node in noisy environments this RC filter may not be needed, but it's easy to add and will ensure smoother AGC performance. The simpleusb driver has a plfilter setting that does a 24db/octave low-cut below 250Hz, which will prevent LF content going out to other nodes and thereby provide a frequency response consistent with radio-based nodes, but because simpleusb's filtering happens after the ADC, excessive LF from the mic can result in degraded dynamics and gain pumping effects if not filtered prior to the MAX9814. Ideally an 18 or 24 dB/octave low-cut filter would be added prior to the MAX9814 in which case the filtering in simpleusb would not be needed, but such a filter would require a significant number of additional components.
The simpleusb driver by default does not filter out low frequencies thus plfilter should be set to yes in simpleusb.conf. Or the usbradio driver can do similar filtering with the rxhpf setting in usbradio.conf, with selectable 250 or 300 Hz -3dB point.
The MAX9814's AGC function (which with relatively short attack and release times acts as a compressor/limiter) brings up the average levels and provides nice even levels, limiting loud peaks while boosting quieter parts. This can result in average RMS levels being higher than other nodes, which can be helpful so long as the audio is not overcompressed or clipped. Many AllStar nodes have quiet audio, probably often because of the use of HTs with low mic gain, and many are too loud. Audio should utilize the full dynamic range of the ADC, have a slight amount of compression to ensure good intelligibility in low dynamic range (high background noise) contexts, and limiting to prevent ADC clipping.
Assembly Steps
I recommend first carefully drilling the appropriate sized holes in the enclosure for the jacks and controls. This template is what I use but be sure to double-check all measurements. I then recommend pre-wiring each module as described in the above sections, at which point the modules then connect together quickly and easily.
Connect the CM108 module to the volume potentiometer, mic jack pins 2, 5 & 8, and the filter cap
Be careful when soldering to the mic and speaker jacks – too much heat can melt the plastic and damage the jacks. I recommend putting a plug in each jack when soldering to help keep the jack contacts stable and better dissipate heat, and not holding the soldering iron on the jack terminals for any more than ~half a second.
Connect the MAX9814 and PAM8302A modules
Connect the speaker jack to the audio amp module

The wiring is now complete. Now plug in a speaker and mic, and plug the USB cable into a MiniPC, RPi or other computer running ASL.
If using the smaller Hammond 1593BBTBU enclosure the assembly steps are the same but things will be more tightly packed:

Pre-wired modules prior to final assembly:


If adding the optional Mic Gain Controls and for a more detailed overview of the recommended assembly steps see the demo video & slideshow below.
Demo Video and Slideshow of All Build Steps with Mic Gain Control Options
Additional Notes
No PTT line is needed since there's no radio, but an LED can be connected to the URI PTT line to show when it's outputting audio, which is useful for seeing when the node is keyed up. The mic's PTT line connects to pin 48 on the CM1xx IC (COS). PTT on most mics is active-low thus no extra resistors or transistors are needed.
Speaker-mics can be supported with this design if a class-AB or single-ended audio amp is used. Speaker-mics have an electret mic element requiring ~2V on the mic audio line, which can be provided with a 2KΩ resistor connected between the audio line on the mic jack to a 10uF filter cap to Ground and an additional ~1KΩ resistor going to the VBIAS pin on the CM1xx. In this case the type of jacks used by the speaker-mic/headset should be used (K1 3.5mm & 2.5mm jacks are recommended).
It does not appear that any speaker-mics are available that have a DTMF keypad, and because DTMF control is a useful feature ideally a DTMF mic and separate speaker can be used. DTMF control is not always needed and does have some limitations however. Apps such as AllScan and Supermon are much easier to use than memorizing various DTMF command codes and node numbers, and they allow you to disconnect from a node without keying it up. For example if you are connected to a repeater/hub node and then want to disconnect, with DTMF you have to key up the mic in order to send the disconnect command, which results in keying up the repeater/hub and all users of that system hearing the button clicks and kerchunk. This can be disruptive to other users and should be avoided if at all possible. DTMF can be useful for other purposes however.
A small speaker could optionally be built into the node enclosure but it's probably simpler to have a 3.5mm TS jack for an external speaker, and optionally an additional 3.5mm TRS jack for headphones or a line out connection.
The CM108B datasheet indicates it will put out 442mVrms into 32Ω which is only 6mW of power, which is enough for some headphones but not for a speaker. Thus an audio amp module is needed, along with a 1KΩ audio-taper volume control potentiometer. A PAM8302A amplifier module will output 2.5W which is plenty for typical use around the QTH. I initially tried an LM386 module which sounded good however it had some occasional quiet clicking noises even when the volume control was all the way down and even with an added bypass capacitor. I then switched to a PAM8302A module and the noise went away. The PAM8302A does have some very quiet background white noise but it's only audible when the node is not keyed and if your ear is right next to the speaker. TDA2822M audio amp modules have also worked very well and may provide slightly better sound quality and less potential for RFI than Class D (digital PWM) amplifiers. I also tried an LM4871 module but it had the same clicking noise issue as the LM386. HJX8002 audio amp modules also have the same issue if used near WiFi.
Node Management
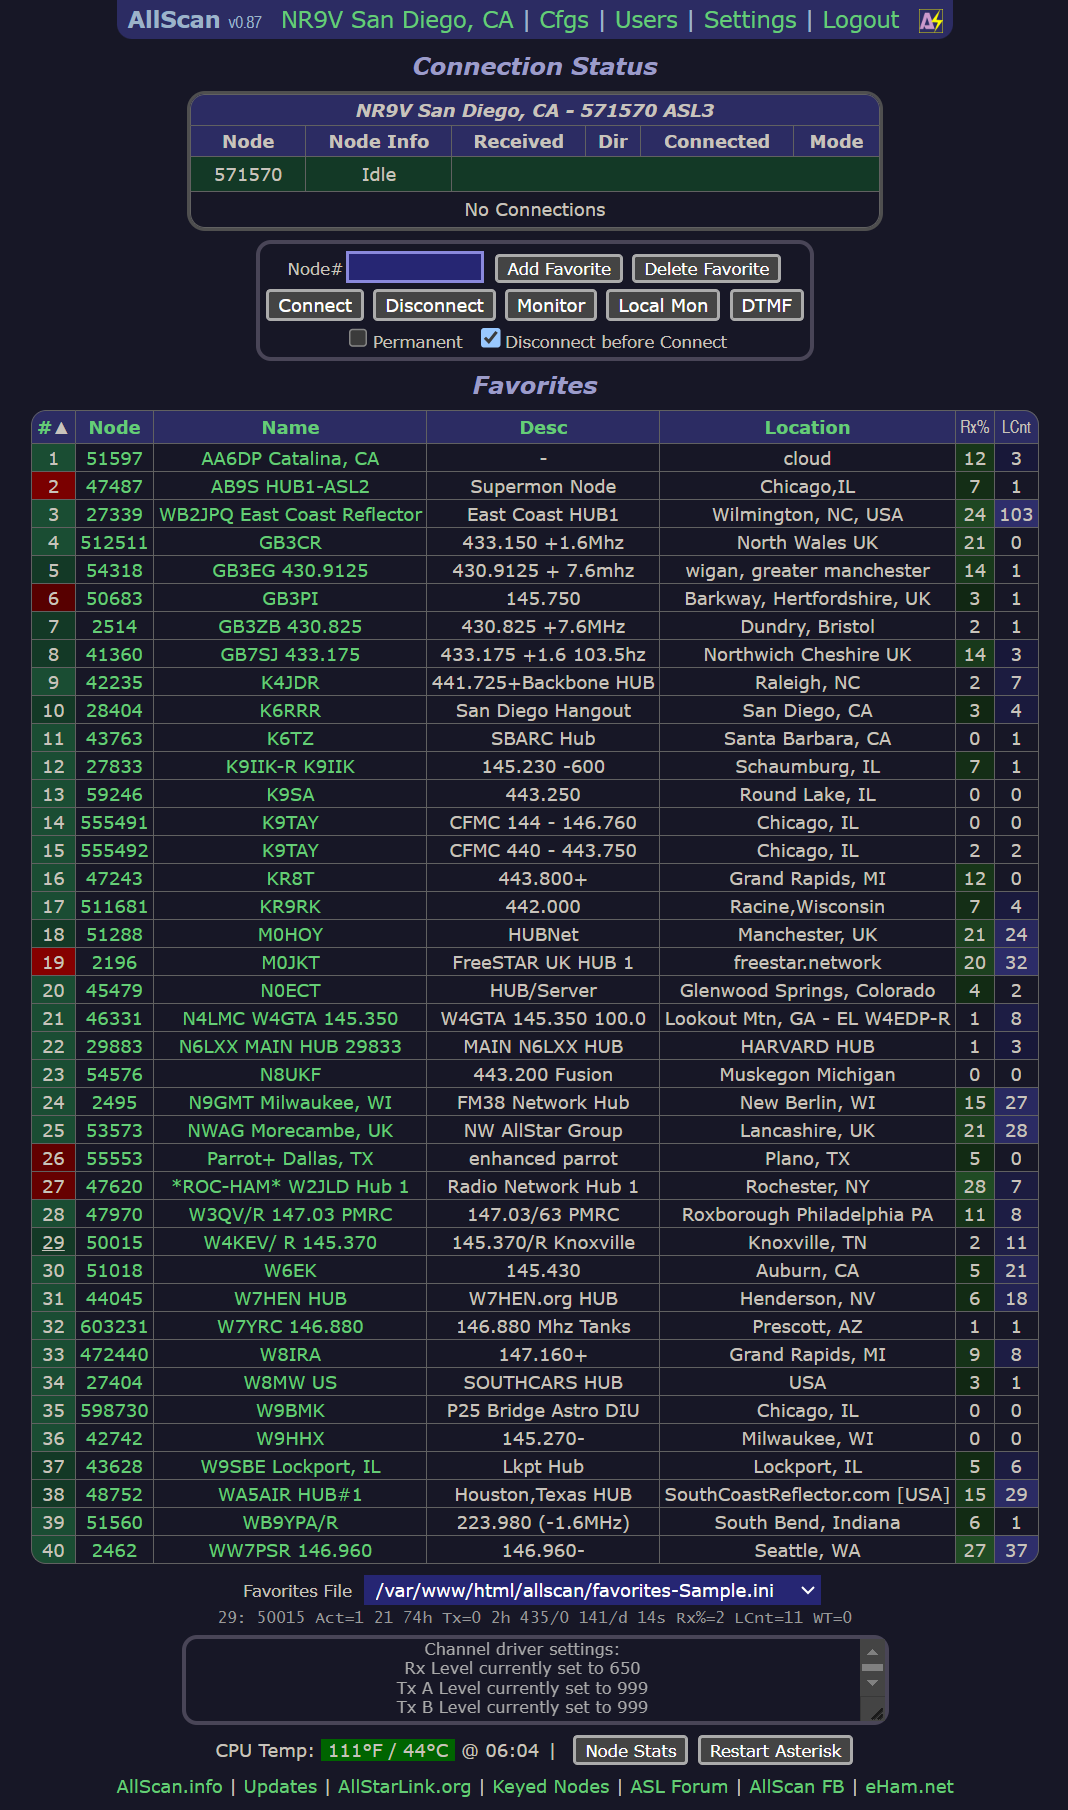
Installing AllMon and then AllScan is highly recommended. AllScan provides a Favorites Dashboard with integrated ASL Stats scanning. This makes it easy to add favorite nodes and see their Tx & Rx activity and Connected Link Count stats in real-time (typically 1-minute resolution). These apps can be used in any web browser.
AllScan Favorites Management & Dashboard Web App
Wi-Fi Support
Wired-internet is more reliable and easier to set up but for a portable node wireless connectivity is important. USB WiFi adapters are inexpensive and fairly easy to set up if you have basic familiarity with Linux. Linux seems to be very good at supporting WiFi devices if they are present when the OS is installed, however if you later add a USB WiFi adapter some significant debugging may be required to get the drivers and network manager properly set up.
Many Dell 3040's come with an internal WiFi card and antennas that work well. Otherwise a cheap USB WiFi adapter should work for short-range communication but I would recommend a reputable brand that's known to work well on Debian Linux and that has a proper antenna. With WiFi frequencies starting at 2.4GHz you'd want at least 1/2λ or 5/8λ ie. 6-7cm antenna length. Any adapter that's smaller than that is probably not going to have good performance. The TP-Link "Archer T2U Plus AC600" look good and are < $20. I would suggest testing and confirming on any potential adapter that signal strength, jitter, packet loss, etc. are acceptable at various distances from your WiFi router.
AllStar and other VOIP / communication applications require low-latency, reliable IP connectivity, and extra care is required to ensure any WiFi devices and networks used are properly set up. If you ever experience audio issues, dropouts, jitter, etc., it is much more likely to be an issue with your network configuration than with ASL or the node itself.
If you use WiFi on a node you should have basic familiarity with Linux and configuring the various settings. Eventually some setting or driver may need to be updated or debugged. Like anything with computers this is not hard to do, just do a web search for what you want or what issue you're seeing and dozens of web pages with plenty of answers will usually come up.
Wi-Fi Setup for nodes with no Desktop GUI (Command-line Only)
This Article has detailed instructions on how to set up WiFi on Debian. This process does require knowing the node's IP address (which can usually be found on your router management page) and initially connecting to the node through ethernet with an SSH app. This may not be easy to do on networks that you do not manage but there are ways to make that easier, for example you can set up a command in ASL to say the node's IP address in response to a DTMF command. On all nodes I ship I have DTMF commands *690 and *691 set up to say the node's LAN and WAN IP addresses. See the AllScan FaceBook Group for details on how to set up these commands, plus many other tips and updates.
Before configuring WiFi as described in the above article you may need to run the following steps: "sudo su", "apt install wireless-tools net-tools wpasupplicant", then run "iwconfig" and confirm a wireless interface is listed. On a Dell 3040 with internal WiFi module this shows a wireless interface named "mlan0". You may then need to run "ifconfig mlan0 up" to start the interface. "iw mlan0 scan" should then list the available networks, or run "iw mlan0 scan | grep SSID" to see just the names.
After first setting up WiFi on a 3040 I was seeing a lot of jitter and audio dropouts but after disconnecting the ethernet cable, restarting my WiFi router and restarting the node, everything worked perfectly.
Another way to set up WiFi on Debian is with iwd, which may be slightly simpler vs. the article above. See this Article for details.
Wi-Fi Setup for nodes with a Desktop GUI
To simplify WiFi network management a Desktop Environment (DE) can be set up on the node such as KDE or MATE along with a small LCD monitor and USB keyboard/trackpad – or use an inexpensive Netbook or small Laptop instead of a MiniPC. Connecting is then as simple as clicking on the network icon and selecting the WiFi network. The DE should then be configured for auto-login so that WiFi will auto-connect after bootup without needing to turn on a monitor and manually log in with a keyboard. The KDE desktop is recommended for MiniPC's/RPi's with ≥16GB eMMC.
KDE is able to automatically enable/disable WiFi based on ethernet connected status, but it seems MATE does not have that option. This Post shows how to set up a Network Manager script that automatically turns Wifi off or on when ethernet is or is not available, which should help ensure WiFi is not left on when not needed.
If you often travel and connect to various WiFi networks, using a small laptop for the node computer rather than a 3040 can make things much easier to manage. These are available for <$150 which is a quite a deal considering they include an LCD, keyboard, trackpad and battery. This makes for an innovative node product that in addition to being an AllStar node works as a regular laptop and runs 1,000's of free programs available on Linux.
Full-Duplex Communication Benefits
Overview
- Full-duplex nodes are always receiving and can be keyed up any time. Half-duplex nodes cannot be keyed up when they are transmitting, making it more difficult to key up a remotely connected repeater system until some time after the courtesy tone or until a carrier drop – which often doesn't happen on busier nets/QSOs.
- Full-duplex nodes are always transmitting when receiving and keyed up, enabling you to hear what's on the remote system (if using a cross-band full-duplex client radio, or if you briefly unkey to check the channel), and if there's a break, comment, double, interference or other issue on the system you'll hear it and can respond appropriately. This greatly improves communications efficiency, interactivity, and situational awareness.
- ASL's
duplex=3setting does not repeat your own audio back to you and thus enables a cross-band full-duplex client radio to work like a full-duplex speakerphone with no echoes or feedback. This is a powerful additional feature provided by AllStar that few if any standalone repeaters are capable of.
Most AllScan nodes and products support full-duplex communication, which provides powerful advantages over half-duplex nodes. This requires setting the duplex parameter to 3 in rpt.conf. If you do not do this you will not hear Rx audio when keyed up and will be more likely to experience doubling and other issues.
Full-duplex is not a new concept and has been in use in various degrees since the dawn of CW...
In The Beginning...
In the beginning...there was CW. Most transceivers support full or semi break-in keying, meaning that the receiver is on between symbols/letters/words sent. Thus if someone is transmitting on a decent radio and making a reasonable attempt to monitor the frequency between characters or words, anyone can easily break in. Thus CW supports interactive, fluid conversation, and allows others to join a QSO or reply to a CQ at any time. CW can be considered semi-duplex because each dit and dash is only a couple 100mS and good radios can switch between Tx and Rx very quickly. Thus the receiver is never off for a significant time and it's easy to hear responses and other activity on the frequency.
And then there was AM, and soon after SSB which is much more energy-efficient and more widely used. Because SSB has no carrier there is no energy transmitted (or very little) during quiet parts ie. between words or during pauses. Experienced hams take advantage of this by briefly unkeying here and there, during pauses or maybe every other sentence, for enhanced awareness of the channel. Experienced OMs tend to keep things shorter and more interactive – just like in-person conversations. When you talk to someone in person you don't just talk for 3+ minutes straight at a time without ever pausing to allow someone to comment, acknowledge, reply, etc. And there's usually no good reason to do this on the ham bands, with some exceptions such as on nets. Thus while SSB is not generally full-duplex, experienced hams use it in an interactive way where they pay attention to what's happening on the frequency (as well as plus or minus a few KHz where there might be QRM or QRN that needs to be worked around), and as a result QSOs tend to be more dynamic and interesting.
And Then There Was FM
Next there was FM. FM sounds better than AM because of its better noise resistance, but it is less energy efficient than SSB due to having a constant power regardless of modulation level. And unlike SSB where you can unkey briefly with no audible effect, if you unkey on FM it results in squelch drops for listeners (unless their radio has unusually good squelch), thus there is a disincentive on FM to pay attention to the channel while you're transmitting.
Due to the FM capture effect, multiple people can't transmit at the same time or the signals interfere destructively or one covers up the other. With SSB that's not an issue and multiple signals combine linearly. One might be louder than the other or you might not be able to follow what either is saying very well but at least you'll be able to tell that there are 2 people talking, vs. FM doubling which can sound like a train wreck. Thus when FM first started being used on repeaters 60+ years ago it sounded great but also had some limitations that earlier modes did not.
As a side note, repeaters don't need to only use FM (or PSK digital equivalents). They could also support SSB without a huge amount of effort. Squelch would be a little more complicated because you don't have a constant carrier to reference, but DSP, signal analysis, noise reduction and AGC techniques have come a long way. It would not be hard to set up a repeater with separate FM and SSB inputs and repeat the audio on separate FM and SSB outputs. This would for the first time (that I know of) enable the advantages of SSB to be achieved on a repeater, namely SSB's inherent resistance to destructive interference and thus the ability to support multiple signals on a single frequency, and SSB's greater power efficiency that would reduce battery use for portable users or give more range with the same average power.
Before the Above There Was The Telephone
Originally repeaters and radios only supported half-duplex (from the user perspective). If you receive at the same time you're transmitting, from a repeater that has only one FM receiver, you're generally just going to hear yourself, or maybe a bunch of noise if someone doubles with you. Technically a repeater is full-duplex because it can transmit at the same time it's receiving, but that doesn't do you a lot of good (beyond the basic advantages that repeaters provide) if no more than 1 repeater user can transmit at the same time. Prior to ASL, only rarely did repeaters actually support true multi-user full-duplex communications. This is in contrast to phones which are multi-user full-duplex and always have been, which is much more natural and intuitive. This is easier to do on a pair of wires than over RF, but can be easily done on RF by using multiple bands/frequencies.
Multi-User Full-Duplex Repeaters
Most repeaters have only one FM receiver, which due to the FM capture effect can only properly receive one signal at a time, thus there was really no such thing as a repeater where any number of people could talk at any time while also hearing everyone else. To support that without ASL currently requires a repeater to have multiple receivers. Such systems do exist and work well for trivia nets or other scenarios with quick-witted hams jumping in with quick comments. San Diego's W6ZN repeater does this and there are numerous interlinked repeater systems with multiple inputs such as the SoCal DARN or PAPA systems where you can listen to one repeater on one mountain and transmit into a linked repeater on another mountain. ASL now makes it much easier for repeaters to support true multi-user full-duplex, as connected (radio-based) user nodes in fact extend the repeater with additional receivers and user-specific link monitoring transmitters (ie. that do not repeat local Rx audio).
And Then There Was The Internet
The Internet is essentially an extension of public telephone systems that had existed for a century before, with the major difference being packet-switching vs. circuit-switching. They both work for getting audio from one place to another regardless of if it's half-duplex or multi-user full-duplex. The internet does this in a general way with no limitations on the application layer.
And Then There Was Asterisk and AllStarLink
Because ASL is based on Asterisk – a phone system, it easily supports full-duplex. Even repeaters that have only one RF input, that would not ordinarily support multi-user full-duplex, if ASL-linked now support this capability by default for all AllStar users. I have tested this on many repeaters and it works just like a full-duplex phone call on a speakerphone. You talk just like you would on a simplex node but if someone else keys up you hear them and if someone doubles you hear it right away. Because you always hear the remote system, if someone starts to double or there's echoes, timeouts, interference, etc. you can simply unkey until the repeater (or node / hub / etc.) is clear. This is a powerful feature that greatly improves the interactivity, efficiency and flexibility of amateur radio repeater communications. And it's an essential feature in emergency comms scenarios.
For those who have not used a full-duplex radio or node, or who do not intuitively understand how much of a difference it makes, a simple analogy is to consider what it would be like if the phone system was only half-duplex. Imagine that when calling a friend, relative, or business if only one person could talk at a time, no one could speak until the other person or people on the call unkeyed, and if when you then did key up to speak you couldn't be sure someone else hadn't keyed up at the same time. This would result in awkward and inefficient conversation because it would no longer be like real in-person communication. In contrast, full-duplex enables natural, smooth, effortless, highly interactive communication.
The duplex=3 setting enables AllStar to work how Asterisk itself works in the default configuration – like a telephone, which are full-duplex and do not repeat your outgoing audio back to you. Telephones work very well and are very easy to use, and it would be shortsighted to not leverage these same capabilities in ham radio when practical.
Multi-User Full-Duplex
Although most people may not know it (even repeater owners), ASL-linked repeaters by default do support true Multi-User Full-Duplex. The repeater itself on analog will not support more than one analog RF input at a time if the repeater has only one FM receiver, but generally will support any number of simultaneous ASL full-duplex users and at least one analog RF input.
By default when a repeater links to ASL it will be with a node whose audio output gets mixed with the RF receiver audio input(s). Some repeaters may prioritize one over the other and only allow one audio channel at a time, or ASL may be linked through some intermediary interface, but even then multiple connected AllStar users can still be full-duplex and talk and hear each other fine, as that's a core feature of Asterisk's architecture. Audio streams from each connected node are always routed to all other connected nodes, just like a VOIP conference call.
Some repeater system admins may opt to give RF Rx audio priority over AllStar Rx audio but there is no advantage to this and it only causes issues. For example if an RF user and an AllStar user key up at the same time the RF users on the repeater will hear only the RF user while AllStar users hear only the AllStar user, thus resulting in 2 separate conversations, which makes for quite a dysfunctional system. Such a phenomenon could be called "halfing" rather than "doubling", as it results in the communications topology being split into separate halves while both users are keyed up. Fortunately only a small number of repeaters seem to have this issue. If you should encounter such a system I suggest letting the admins know there is a better approach, ie. combine (mix) the audio inputs rather than prioritize one over another.
Amateur vs. Professional
Go on any repeater net that has more than a dozen or so users and you'll frequently hear doubles and other issues, which can waste minutes of everyone's time, result in inefficient communication, and could even be described as "amateurish". Full-duplex solves these issues and gives you full situational awareness. This goes back to the definitions of "amateur" vs. "professional". Amateur means that something is not for-profit, but should not imply a lack of ability or expertise. If hams have a way to make communications more efficient and reliable but choose not to, they are committing a disservice to the hobby. Full-duplex enables communicating as if you were standing right next to everyone, and AllStar makes this very easy to do.
The Fundamentals of AllStar and Repeater Systems
AllStar has evolved over ~20 years from a complicated system originally requiring expensive PCI cards to then being ported to RPi's and some very "old-school" node designs, to now becoming increasingly more popular.
AllStar is not just a simple gadget you buy or an app you download in 2 minutes and run on Windows or a smartphone. (There are some phone apps but they have a lot of limitations and don't work nearly as well as a real node.) It does many different things and is part of Asterisk and Debian Linux - each very powerful platforms. Many newcomers to AllStar don't fully understand its history, how it evolved, and the many ways it can be used, and as a result many common misconceptions result.
Going back to the beginning, the intention of AllStar was to link repeater systems. To leverage IP and VOIP technology to extend the range of repeaters, and transcend the limitations of RF. There are two things in ham radio: hams and radio. Which is more important? Obviously the hams. Being a ham is not just about using radios, it's about communicating, whether over RF, IP, email, telephone, blog posts, articles, social media, youtube, hamfests, etc.
Two tin cans and a string are also a way of communicating, as are smartphones, $15 Chinese HTs, or DMR radios or QRP rigs. Repeaters are a little different than all these things though, in some important ways. Repeaters usually have wide coverage with consistent RF performance, very little dependence on band conditions and excellent audio quality. And they support full-duplex, enabling a few Watts from an HT 10 or 20 miles away to be amplified and simultaneously rebroadcast from a mountain top - thereby expanding the coverage to 50-100+ miles. They do all this for free with no cell phone monthly plan required, no apps to download, and no dependence on the grid, while often being associated with ham radio clubs that meet for lunches, pizza & beer, field days, community service events, and various projects.
Single-Band Full-Duplex vs. Cross-Band Full-Duplex vs. Cross-Band Repeat
There are some common misconceptions and conflations between these terms thus it's important to further define them:
- Single-Band Full-Duplex - This is what most repeaters do and is what was necessary back 50 years ago when there was no such thing as dual-band or cross-band full-duplex HTs. Repeaters are still stuck with only being able to do full-duplex on one band because (A) there are still many single-band-only radios out there, and (B) they don't want to confuse users by having the repeater input and output be on different bands. The problem with single-band full-duplex however is that only the repeater itself is operating full-duplex. The other radios people talk into the repeater with will work in simplex only, because there are no HTs or mobiles that can do full-duplex on one band.
- Cross-Band Full-Duplex - This means that both the repeater or node and client radios can in fact all be operating full-duplex ie. receiving and transmitting at the same time. Talking on a cross-band full-duplex HT is then just like talking on a cellphone or speakerphone or plain old vintage telephone. You hear both sides of the conversation and anyone can join the conversation or say something anytime without having to wait until you unkey. In contrast, with half-duplex once you key up you have to just "assume" that your node is actually receiving you and that no one doubled with you.
- Cross-Band Repeat - This is a common feature provided on some HTs and mobiles but is not useful with AllStar. Most of these radios will not actually support cross-band full-duplex on the radio's mic and speaker. Cross-band repeat functions should not be used with AllStar.
Perhaps the #1 misconception about Cross-Band Full-Duplex is that it is the same thing as Cross-band Repeat, or that it will somehow repeat audio or cause echoing/feedback, but this is in fact nothing more than a misconception. See also this Freddie Mac Video that further discusses the differences between a cross-band full-duplex personal node and a cross-band repeater.
VFO & Memory Channel Programming Notes
When setting up a radio for use with a Cross-Band Full-Duplex node, the Rx frequency must be in one VFO and the Tx frequency in the other VFO. Most radios do not support storing data for 2 VFOs in 1 memory channel thus 2 memory channels are required. When switching between local repeater channels and the node frequencies those memory channels may need to then be selected on each VFO. If the Tx & Rx frequencies are put into just one memory channel (eg. by programming in a ~300MHz offset) the radio will then only do cross-band Half-duplex, which will not provide most of the benefits of Cross-Band Full-Duplex. Note in the image below how the node Tx frequency is in the top VFO of the KG-Q10H and the node Rx frequency is in the bottom VFO. Each VFO has that frequency only, with no Tx offset.
Real-World Examples
Repeaters are unique within ham radio as being one of the few types of systems that are full-duplex, meaning that they receive and transmit at the same time. As a result AllStar also had to be full-duplex. Let's say you have a repeater on a mountain near you that you talk on with your friends. You have nets and long QSO's and can talk from anywhere in your town, city or county. It works great, and it's intuitive and simple to use. When someone unkeys, you wait for the courtesy tone, key up and you're on the air. If it's a busy net maybe you unkey for half a second just to make sure no one doubled with you. Or to make a quick comment, just key up before the courtesy tone. This all works well, and has been working like that for 60+ years.
A properly set up full-duplex AllStar node preserves all the above capabilities. If done properly it is completely indistinguishable from the actual repeater system. If you're out of town or out-of-range of your favorite repeater but want to stay in contact with everyone, with a full-duplex node you can connect to the repeater through AllStar and talk on the repeater in the exact same way you would when at home – with no limitations and no difference in audio quality.
This is why full-duplex is an important feature to have in an AllStar node, yet most of the nodes people are using today are not full-duplex. As a result these users can't talk on a connected repeater until all users unkey and the node's Tx carrier drops. If it's a busy net and people do what they normally do - key up a short time after the courtesy tone - people on half-duplex nodes often will not be able to key up the system. If the repeater system is set up properly such that hang time is not propagated to AllStar then half-duplex nodes can still get in before the carrier drop but this is not always set up correctly, and can be made worse on SA818-nodes that have keyup delays, CTCSS issues, etc.
Full-duplex nodes don't have those issues. They are always receiving and always able to instantly respond when you transmit, no matter what else is happening on AllStar. And if you key up on a busy net and want to be sure no one doubled with you, even if your HT is only half-duplex, you can just unkey for half a second and you'll hear what's happening on the remote system. Thus full-duplex nodes not only always listen, but they also always transmit when you're keyed up so that you can easily hear if there is other activity on the channel. This works perfectly on radio-less interfaces such as the UCI120, works well on HTs that support cross-band full-duplex eg. a Wouxun KG-UV9D Plus, KG-Q10H, Alinco DJ-G7T or Yaesu FT-51R or FT-530, works great on higher-end cross-band full-duplex mobile radios, and also works to an extent on half-duplex radios if you briefly unkey occasionally to confirm that the channel is clear. Full-duplex nodes make it easier to do what hams do – communicate.
Node Notes / Instructions
Visit the Notes / Instructions page for useful notes regarding the general operation of any AllStar node.
Troubleshooting
If there is any noise on the node's transmit or receive audio, try adding a small ferrite clip-on filter on various cables. And to prevent possible ground loops, keep all wiring as short as possible and always run power and audio wires/cables in straight lines and next to each other rather than spread apart or in any kind of shape resembling a loop. Also be sure to use a star-ground configuration such that there is no more than one ground path between any 2 node components.
If you get distorted audio or stuttering/dropouts, or inbound connection attempts to your node do not work, make sure all your port settings match on the ASL site for both the server and the node, and that those match the port settings in iax.conf (bindport), rpt.conf ([node#] = radio@ip:port), in the node's firewall configuration, and in the router/cable modem. This is 6 different places the port has to be set. If it's your first node then you probably have the default of 4569 and didn't need to change anything, but if it's not your first node then a different port number is required (eg. 4570, 4571, ...), and all 6 of those places need to have the same setting. The node can still appear to be working fine if those settings don't match but issues may be more likely to occur.
Conclusion
My goal has been to build high-quality full-duplex radio-less and radio-based nodes as cost-effectively as possible that are self-contained, portable and compact. I also build and sell fully assembled, configured and tested nodes and USB interface modules. For more info see the Products page.
Contact
For questions, feedback or other inquiries email david at allscan.info.